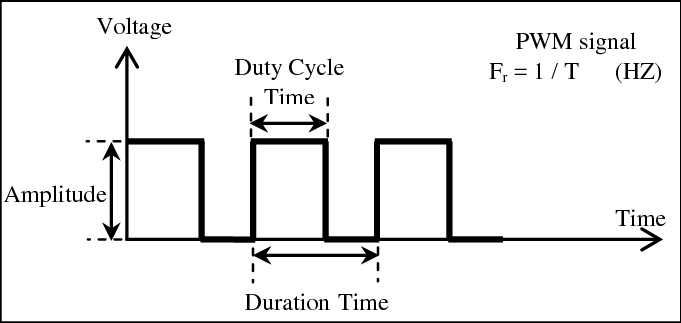
What is PWM
By dividing an electrical signal into discrete pieces, pulse-width modulation (PWM) or pulse-duration modulation (PDM) is a technique for lowering the average power produced by an electrical signal. By rapidly flipping the switch between the supply and the load on and off, the average amount of voltage (and current) provided to the load is managed. The total power provided to the load increases while the switch is on for a longer period of time compared to when it is off.
Calculations
Available duty cycle = (2^bit)-1
Maximum frequency = clock frequency/2^bit
example : bit=10,clock frequency=8Mhz
Available duty cycle = (2^10)-1 = 1023
Maximum frequency = 80000000/2^10 = 78.125khz
PWM in stm32
HardwareTimer timer(1);  //select timer

void setup() {
pinMode(PA8, PWM);  //set PA8 as pwm pin
timer.setPrescaleFactor(1);   //select prescaler
timer.setOverflow(1024); //set duty cycle from calculation
}

void loop() {
pwmWrite(PA8,pwm_value);  //write the pwm value to PA8
}
PWM in Esp32
const int ledPin = 16;  // 16 corresponds to GPIO16

// setting PWM properties
const int freq = 5000; //set the maximum frequency from calculating max frequency avalible for the resolution you selected from formula
const int ledChannel = 0;
const int resolution = 8; //set resolution

void setup(){
  ledcSetup(ledChannel, freq, resolution);  // configure

  ledcAttachPin(ledPin, ledChannel); // attach the channel to the GPIO to be controlled
}

void loop(){
  // increase the LED brightness
  for(int dutyCycle = 0; dutyCycle <= 255; dutyCycle++){
    // changing the LED brightness with PWM
    ledcWrite(ledChannel, dutyCycle);
    delay(15);
  }

  // decrease the LED brightness
  for(int dutyCycle = 255; dutyCycle >= 0; dutyCycle--){
    // changing the LED brightness with PWM
    ledcWrite(ledChannel, dutyCycle);
    delay(15);
  }
}
PWM on Arduino
//Initializing LED Pin
int led_pin = 6;
void setup() {

  pinMode(led_pin, OUTPUT); //Declaring LED pin as output
}
void loop() {
  //Fading the LED
  for(int i=0; i<255; i++){
    analogWrite(led_pin, i);
    delay(5);
  }
  for(int i=255; i>0; i--){
    analogWrite(led_pin, i);
    delay(5);
  }
}
How to configure fast PWM on Arduino
pinMode(3, OUTPUT);
pinMode(11, OUTPUT);
TCCR2A = _BV(COM2A0) | _BV(COM2B1) | _BV(WGM21) | _BV(WGM20);
TCCR2B = _BV(WGM22) | _BV(CS22);
OCR2A = 180;
OCR2B = 50;
Output A frequency: 16 MHz / 64 / (180+1) / 2 = 690.6Hz
Output A duty cycle: 50%
Output B frequency: 16 MHz / 64 / (180+1) = 1381.2Hz
Output B duty cycle: (50+1) / (180+1) = 28.2%
A good explanation of setting fast PWM on Arduino is provided in the Arduino website
https://docs.arduino.cc/tutorials/generic/secrets-of-arduino-pwm

